Authentication and Authorization in Dropwizard App (Kotlin)
Do you know how to perform authentication and authorization in Dropwizard? Neither did I, but I had to learn it for a recent work project and I thought I would share what I have learned with you.
Authentication
Authentication is used in order to identify who the user is.
There are several authentication schemes that is used by the HTTP authentication framework.
In this post, we will talk about the “Basic” authentication schemes for simplicity.
An important note: In Basic scheme, the user ID and password are passed in base64-encoding over the network. HTTPS/TLS should be used if you are using this scheme. The reason for this is that base64 is reversible encoding, as you will see in this post.
The Basic scheme flow:
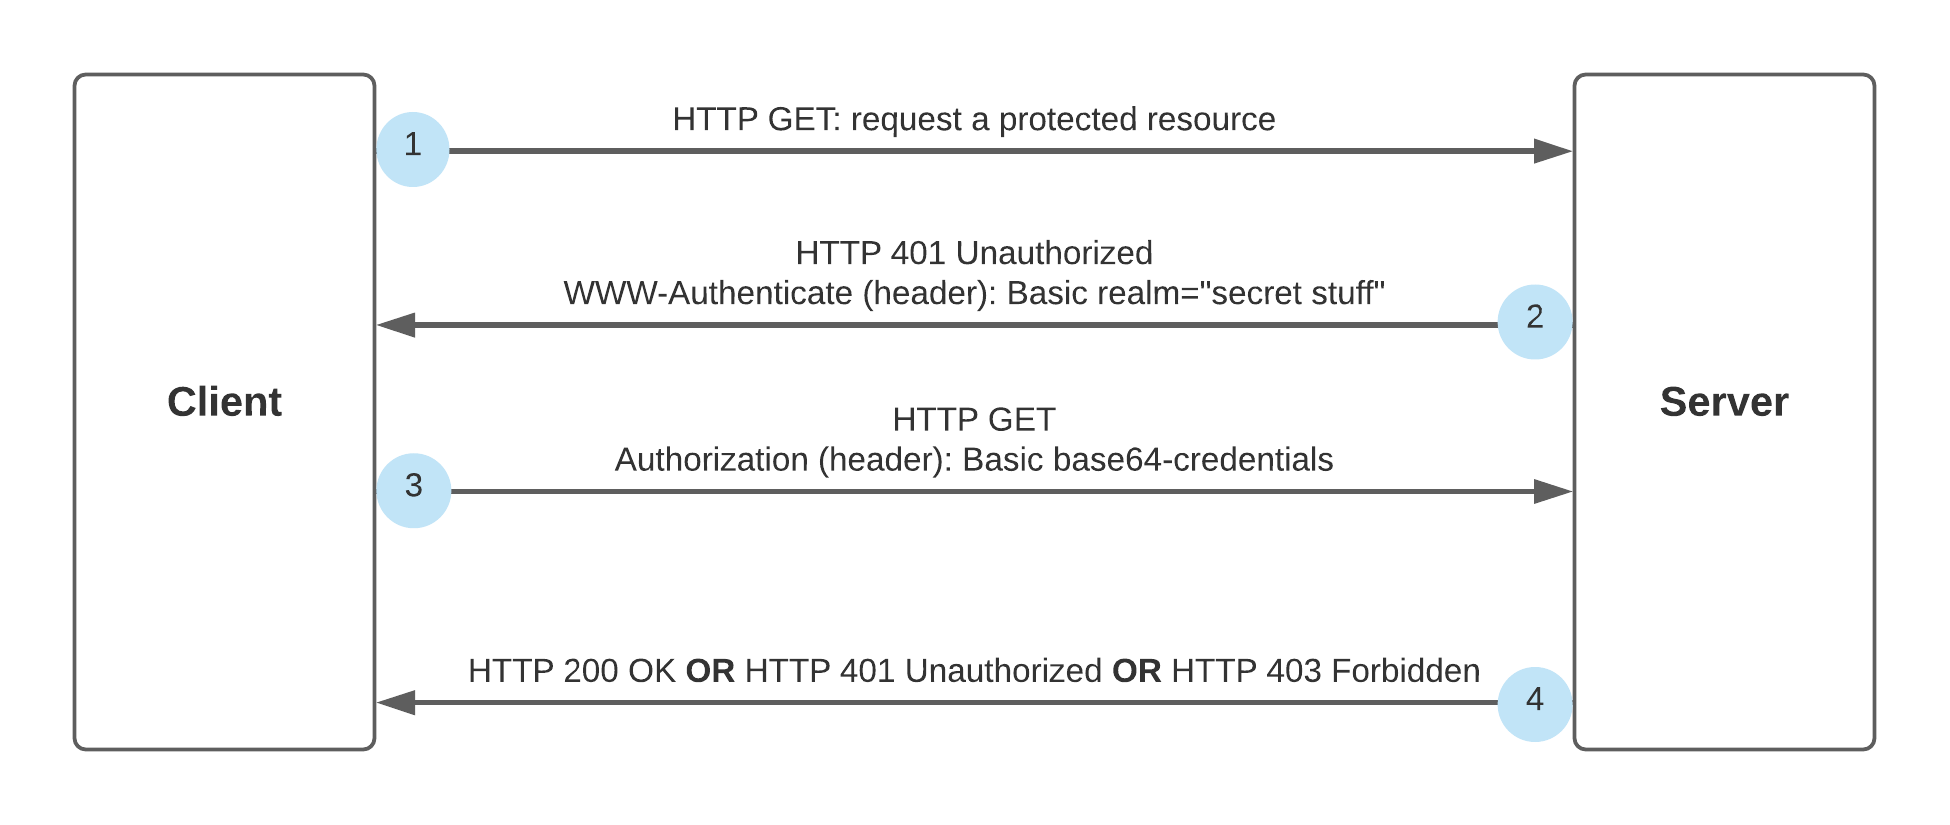
- The client tries to access a server resource through HTTP GET.
- The server sends a 401 Unauthorized response along with WWW-Authenticate header, which defines the authentication method. In our case the authentication method is “Basic”.
- The client can trigger HTTP GET including an Authorization header with the credentials, in order to authenticate.
- In this step there are 3 options:
- The server will send HTTP 200 OK, which indicates that the authentication has succeeded.
- The server will send a HTTP 401 Unauthorized response again, which means that the credentials were wrong.
- The server will send HTTP 403 forbidden. In this case, the user authenticated successfully, but does not have the right permissions in order to access the resource.
You can find the official HTTP/1.1 Authentication documentation in RFC-7235
Authorization
We use authorization to manage users permissions in our app. This is the process of granting or denying access to a resource based on the user’s identity.
For example, if we want to create an API for user deletion, we would probably like to give a permission for this API just for the admin of the system, and not for a regular user.
The relevant error status code is 403 Forbidden. When a 403 is sent, authentication is possible, but the user does not have the right permissions.
How to Implement Authentication and Authorization in Dropwizard App
I believe it is easier to understand how all of these things work through a real example, so let’s start to implement authentication and authorization from scratch in our Dropwizard app.
I assume you know how to create a dropwizard app, if not, you can read my previous post Create an app with Dropwizard, Maven and Kotlin.
POM Dependency
In order to use Dropwizard authentication, you should add the following dependency to POM file:
<dependency>
	<groupId>io.dropwizard</groupId>
	<artifactId>dropwizard-auth</artifactId>
	<version>${dropwizard.version}</version>
</dependency>
Defining User Roles
We will define 2 enums, the first one represents the user role. The second one represents group roles.
For example, the ADMIN group role has all the permissions - GUEST, USER and ADMIN permissions.
The GUEST user group role has only GUEST permissions.
package com.ronp.mydropwizardapp.auth

enum class Role(val roleName: String) {
    GUEST(roleName = "Guest"),
    USER(roleName = "User"),
    ADMIN(roleName = "Admin");
}

enum class GroupRoles(val roles: Set<Role>) {
    GUEST(roles = setOf(Role.GUEST)),
    USER(roles = setOf(Role.GUEST, Role.USER)),
    ADMIN(roles = setOf(Role.GUEST, Role.USER, Role.ADMIN))
}
Implementing the Principle Object
Once the user is authenticated, the application establishes the Principle. The Principle is an object which represents the currently-logged-in user in the context of the application.
One user can have multiple IDs, for example, if the user has several gmail accounts. However, there is usually just one logged-in user per request and this is going to be the Principle.
We will implement a java.security.Principal interface as follows:
package com.ronp.mydropwizardapp.auth

import java.security.Principal

data class MyAppUser(private val name: String, val groupRoles: GroupRoles): Principal {
    override fun getName() = name
}
Creating a Custom Authenticator
Now we can create our authenticator which implements Interface Authenticator<C,P extends Principal>.
The authenticator gets user basic credentials as input and should validate them. If the authentication succeeds, the authenticate function should return a Principle object (user) in an Optional container. Otherwise, an empty Optional is returned, indicating that the credentials are invalid.
Here is the implementation:
package com.ronp.mydropwizardapp.auth

import io.dropwizard.auth.Authenticator
import io.dropwizard.auth.basic.BasicCredentials
import java.util.*


class MyAppBasicAuthenticator : Authenticator<BasicCredentials, MyAppUser> {
    override fun authenticate(credentials: BasicCredentials): Optional<MyAppUser> {
        return if ("secret" == credentials.password) {
            val groupRoles = GroupRoles.valueOf(credentials.username.toUpperCase())
            val user = MyAppUser(name = credentials.username, groupRoles = groupRoles)
            Optional.of(user)
        } else {
            Optional.empty()
        }
    }
}
Note: this is a simple authenticator implementation just for demonstration.
Creating a Custom Authorizer
Our authorizer should implement the Interface Authorizer< P extends Principal >, which has a single method “authorize” that gets a Principle (user) and role, and is responsible for deciding if access is granted to this principle.
package com.ronp.mydropwizardapp.auth

import io.dropwizard.auth.Authorizer

class MyAppAuthorizer: Authorizer<MyAppUser> {
    override fun authorize(user: MyAppUser, role: String): Boolean {
        return user.groupRoles.roles.contains(Role.valueOf(role.toUpperCase()))
    }
}
Authenticator and Authorizer Registration
We are ready to register the custom authenticator and authorizer in our Dropwizard app.
package com.ronp.mydropwizardapp

import com.ronp.mydropwizardapp.auth.MyAppAuthorizer
import com.ronp.mydropwizardapp.auth.MyAppBasicAuthenticator
import com.ronp.mydropwizardapp.auth.MyAppUser
import com.ronp.mydropwizardapp.configuration.MyAppConfig
import com.ronp.mydropwizardapp.resources.HelloWorldResource
import io.dropwizard.Application
import io.dropwizard.auth.AuthDynamicFeature
import io.dropwizard.auth.AuthValueFactoryProvider
import io.dropwizard.auth.basic.BasicCredentialAuthFilter
import io.dropwizard.setup.Environment
import org.glassfish.jersey.server.filter.RolesAllowedDynamicFeature

class MyApp: Application<MyAppConfig>() {
    companion object {
        @JvmStatic fun main(args: Array<String>) = MyApp().run(*args)
    }

    override fun run(myAppConfig: MyAppConfig, environment: Environment) {
        environment.jersey().register(HelloWorldResource(myAppConfig.configTest))
        environment.jersey().register(AuthDynamicFeature(
                BasicCredentialAuthFilter
                        .Builder<MyAppUser>()
                        .setAuthenticator(MyAppBasicAuthenticator())
                        .setAuthorizer(MyAppAuthorizer())
                        .setRealm("Secret stuff")
                        .buildAuthFilter()))
        environment.jersey().register(RolesAllowedDynamicFeature::class.java)
        environment.jersey().register(AuthValueFactoryProvider.Binder(MyAppUser::class.java))
    }
}
AuthDynamicFeature enables HTTP basic authentication.
RolesAllowedDynamicFeature enables HTTP authorization.
AuthValueFactoryProvider allows you to use @Auth to inject a custom Principal type into your resource.
In this example we are using BasicCredentialAuthFilter which supplies us with an out-of-box authentication filter (implementation of AuthFilter).
It is possible to define a custom filter if needed. To do that you should use AuthDynamicFeature and implement the AuthFilter Dropwizard class.
Secure Our Resources
There are 2 options to secure your resource:
- Use one of
@RolesAllowed,@DenyAll,@PermitAllannotations. Each one of this annotations will trigger the authenticator and the authentication filter, in order to validate the credentials, and the authorizer, in order to check the permissions. - Use
@Authannotation, in order to trigger the authenticator and the authentication filter.
An important note: Using @PermitAll and not setting any of these annotations is not the same! If you don’t set one of these annotations, the authenticator will not be triggered, so any user can access this API.
package com.ronp.mydropwizardapp.resources

import com.ronp.mydropwizardapp.auth.MyAppUser
import io.dropwizard.auth.Auth
import javax.annotation.security.RolesAllowed
import javax.ws.rs.GET
import javax.ws.rs.Path

@Path("/")
class HelloWorldResource(private val property: String) {

    @RolesAllowed("Admin")
    @Path("/helloWorld")
    @GET
    fun helloWorld(@Auth user: MyAppUser) = "Hello World $property :)"
}
Testing our security
Let’s access to our application in the browser through http://localhost:port/helloWorld.
In the IntelliJ terminal you can see that the server sent GET /helloWorld HTTP/1.1" 401 as described on the flow diagram (step 2).
You should see a sign-in dialog box where you can enter a username and password in order to authenticate.
Let’s try to enter different credentials to see what happened:
- Try entering wrong credentials. You should get another HTTP 401 Unauthorized error, which indicates an authentication failure.
- Try entering guest credentials. You should get an HTTP 403 Forbbiden, as we defined
@RolesAllowed("Admin")on our resource. - Finally, we can enter the admin credentials. You should get 200 OK status code. Looking at the HTTP request header (click F12 in the browser), we can see the following Authorization header:
Authorization: Basic QWRtaW46c2VjcmV0
TheBasicstands for the HTTP Basic schema, and the stringQWRtaW46c2VjcmV0represents the credentials in base64-encoding. We can use a base64 encoder, and we will get the credentials we entered:Admin:secret